In my journey to write better software I have been looking at various patterns available. One of them is known as the Model View Presenter or MVP pattern. In doing some reading many of the sites I have come across point to Martin Fowlers website who is well known for his contribution in design patterns. He has put the MVP pattern into two separate types Passive View and Supervising Controller.
In this blog entry I am going to focus on the Passive View as it provides complete separation from your model and allows you to completely mock out your view for testing. One additional note is that I found many people swap out the term Presenter for Controller which is a bit confusing since another pattern exists called (MVC) Model View Controller. So I will be sticking to the term Presenter.

Disclaimer: I am just starting to understand this pattern so I may not explain it or design it in a way that maintains 100% true to the pattern. I am looking forward to feedback or comments that would correct anything I have misunderstood or may provide a clearer understanding of the pattern.
Views - Views are the entry point into the process. In the case of a asp.net application this would be the .aspx page. In the case of a winform application it would be the form itself. Each view will have a interface that represents the data that needs to be inserted, retrieved, or databound to the view.
Presenter - Each view will have a presenter assigned to it that is responsible for handling all interaction with the view. The goal of the presenter is to move the logic out of the view itself and put the responsibility into the presenter.
Model - The model is a representation of the data that should be displayed on the view. In some cases the model is represented by some object that is returned from a datasource such as a database. In many cases additional layers exist between the datasource and model and business specific entities may have been created to represent the model while abstracting away the source of the information.
So how does this relate to a standard project we would create. In order to demonstrate the benefit of the pattern I am going to create a small winform application using the way I would have normally coded it and then refactor the project to use the MVP pattern.
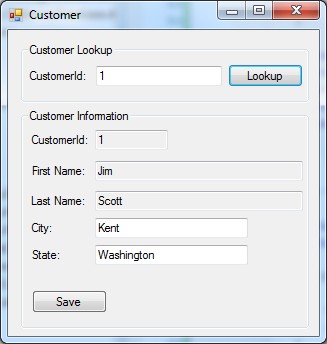
Project Summary: Create a windows application with one form that if given a customerId will lookup customer in our datasource and display the first and last name, City and State. Once a customer has been retrieved the user should be able to edit the City or State and save the changes. Validation should also be performed to ensure that customerId is an integer value, City and State is required and cannot be empty.
Project Details: Winform application using .net 3.5 framework. Data will be stored and retrieved from SQL Express database using Linq to SQL and will return to the Presenter the actual Ling to SQL entities that this framework creates.
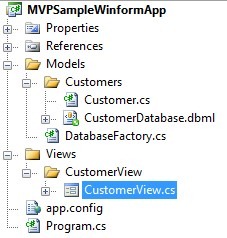
Project Layout: I created a folder called Views which will contain a sub folder for each view I am creating. I personally do this because each view has an associated Interface and Presenter class created and this provides a simple way to keep them together. I will also create a Models folder which will hold my Linq to SQL code and anything I do to extend the Models.

CustomerView Form – Here is the form that will display and allow editing of City and State

CustomerView.cs - Here is the initial code with all interaction between the model and the view being directly inside the form. The problem with this particular way of developing is that the only way to test the application is to bring up an instance of the application and manually test or use some kind of test automation software that records and plays back things.
public partial class CustomerView : Form
{
public CustomerView()
{
InitializeComponent();
}
private void buttonSearch_Click(object sender, EventArgs e)
{
string customerIdString = this.textBoxCustomerId.Text.Trim();
int customerId;
Customer customer = null;
if (customerIdString == "")
{
MessageBox.Show("CustomerId cannot be empty");
return;
}
try
{
customerId = Int32.Parse(customerIdString);
}
catch
{
MessageBox.Show("CustomerId must be an integer value");
return;
}
try
{
customer = Customer.GetCustomerById(customerId);
}
catch (Exception ex)
{
MessageBox.Show(ex.Message);
return;
}
this.textBoxCustomerIdReadOnly.Text = customer.CustomerId.ToString();
this.textBoxFirstName.Text = customer.FirstName;
this.textBoxLastName.Text = customer.LastName;
this.textBoxCity.Text = customer.City;
this.textBoxState.Text = customer.State;
}
private void buttonSave_Click(object sender, EventArgs e)
{
string city = this.textBoxCity.Text.Trim();
string state = this.textBoxState.Text.Trim();
if (this.textBoxCustomerIdReadOnly.Text == "")
{
MessageBox.Show("No customer has been loaded");
return;
}
if (city == "")
{
MessageBox.Show("City cannot be empty");
return;
}
if (state == "")
{
MessageBox.Show("State cannot be empty");
return;
}
Customer customer = new Customer();
customer.CustomerId = Convert.ToInt32(this.textBoxCustomerIdReadOnly.Text);
customer.FirstName = this.textBoxFirstName.Text;
customer.LastName = this.textBoxLastName.Text;
customer.City = this.textBoxCity.Text;
customer.State = this.textBoxState.Text;
try
{
Customer.SaveCustomer(customer);
MessageBox.Show("Customer Saved");
}
catch (Exception ex)
{
MessageBox.Show(ex.Message);
}
}
}
Refactoring to use MVP: Now I will refactor the above code to use the MVP Passive View pattern. This will create an Interface that represents the view and place a presenter in between the Model and the View to do all the interaction between layers.
ICustomerView – I created an interface ICustomerView that will represent the data on the form as shown below. This view will get injected into the Presenter constructor so that it has access to writing and retrieving values from the View.
public interface ICustomerView
{
string CustomerIdInput { get; }
string CustomerIdReadOnly { set; get; }
string FirstName { get; set; }
string LastName { get; set; }
string City { get; set; }
string State { get; set; }
void ShowMessage(string message);
}
CustomerViewPresenter – The CustomerView form will contain an instance of this class which will take control of the setting and getting of values from the form. It will also handle the retrieving and saving of information from the Model. Notice that the constructor takes an instance of ICustomerView
public class CustomerViewPresenter
{
private ICustomerView customerView;
public CustomerViewPresenter(ICustomerView customerView)
{
this.customerView = customerView;
}
public void LoadCustomer()
{
}
public void SaveCustomer()
{
}
}
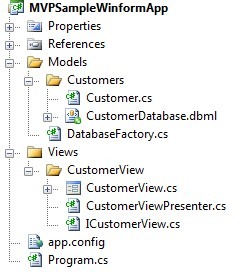
Refactored Project View – This shows the additional files created ICustomerView and CustomerViewPresenter.

CustomerView Refactored - Now that I have the interface and presenter created let’s move our code from our CustomerView form into our presenter. Notice that the form now has a private instance declared CustomerViewPresenter and in the constructor of the view we instantiate a new instance of the presenter and pass in ICustomerView represented by this. Also note that the search and save button click events no longer contain any code to load or save the customer but rather calls the presenter methods to take care of the logic.
public partial class CustomerView : Form, ICustomerView
{
CustomerViewPresenter customerViewPresenter;
public CustomerView()
{
InitializeComponent();
customerViewPresenter = new CustomerViewPresenter(this);
}
private void buttonSearch_Click(object sender, EventArgs e)
{
customerViewPresenter.LoadCustomer();
}
private void buttonSave_Click(object sender, EventArgs e)
{
customerViewPresenter.SaveCustomer();
}
#region ICustomerView Members
public string CustomerIdInput
{
get { return this.textBoxCustomerId.Text.Trim(); }
}
public string CustomerIdReadOnly
{
get { return this.textBoxCustomerIdReadOnly.Text; }
set { this.textBoxCustomerIdReadOnly.Text = value; }
}
public string FirstName
{
get { return this.textBoxFirstName.Text.Trim(); }
set { this.textBoxFirstName.Text = value; }
}
public string LastName
{
get { return this.textBoxLastName.Text.Trim(); }
set { this.textBoxLastName.Text = value; }
}
public string City
{
get { return this.textBoxCity.Text.Trim(); }
set { this.textBoxCity.Text = value; }
}
public string State
{
get { return this.textBoxState.Text.Trim(); }
set { this.textBoxState.Text = value; }
}
public void ShowMessage(string message)
{
MessageBox.Show(message);
}
#endregion
}
CustomerViewPresenter - Below shows what is inside the presenter now. Since the presenter gets passed into it an interface representing the view it can now interact directly with the view. It is now up to the presenter to talk to the Model and get a customer and set the views information or retrieve information from the view and save it.
public class CustomerViewPresenter
{
private ICustomerView customerView;
public CustomerViewPresenter(ICustomerView customerView)
{
this.customerView = customerView;
}
public void LoadCustomer()
{
Customer customer = null;
int customerId;
if (customerView.CustomerIdInput == "")
{
customerView.ShowMessage("CustomerId cannot be empty");
return;
}
try
{
customerId = Int32.Parse(customerView.CustomerIdInput);
}
catch
{
customerView.ShowMessage("CustomerId must be an integer value");
return;
}
try
{
customer = Customer.GetCustomerById(customerId);
}
catch (Exception ex)
{
customerView.ShowMessage(ex.Message);
return;
}
customerView.CustomerIdReadOnly = customer.CustomerId.ToString();
customerView.FirstName = customer.FirstName;
customerView.LastName = customer.LastName;
customerView.City = customer.City;
customerView.State = customer.State;
}
public void SaveCustomer()
{
if (customerView.CustomerIdReadOnly == "")
{
customerView.ShowMessage("No customer has been loaded");
return;
}
if (customerView.City == "")
{
customerView.ShowMessage("City cannot be empty");
return;
}
if (customerView.State == "")
{
customerView.ShowMessage("State cannot be empty");
return;
}
Customer customer = new Customer();
customer.CustomerId = Convert.ToInt32(customerView.CustomerIdReadOnly);
customer.FirstName = customerView.FirstName;
customer.LastName = customerView.LastName;
customer.City = customerView.City;
customer.State = customerView.State;
try
{
Customer.SaveCustomer(customer);
customerView.ShowMessage("Customer Saved");
}
catch (Exception ex)
{
customerView.ShowMessage(ex.Message);
}
}
}
So you might be asking about now “Why do I want to move all my logic to another class? Seems like all I did was make things more complicated and created more code!”. The real value of doing it this way comes in the ability to now write unit tests against our code.
Since the CustomerView now has an interface ICustomerView that represents the view, we can now substitute the real form for a mocked version of it and perform all the validation we would normally have done manually.
The other benefit you get is that you have separated the logic from your view so you could use this same code to create an asp.net web application by just creating your aspx pages and reusing all of your interface and presenter code.
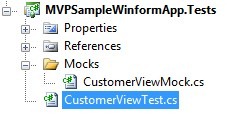
Testing – Below is the project view of my test project. It is when you get to this part you find the real advantages of your work above. Below is the view of the test project. Note the two files CustomerViewMock.cs which is a mock of our real view and CustomerViewTests.cs which contains all our test we want to perform.

CustomerViewMock – This class in my test project represents my view. Note that the class inherits from my ICustomerView interface. You will also notice that I created public properties representing each of the components that would have been on my real form. I do this to keep my tests feeling like I am interacting with the real form.
public class CustomerViewMock : ICustomerView
{
public string textBoxCustomerId { private get; set; }
public string textBoxCustomerIdReadOnly { get; private set; }
public string textBoxFirstName { get; private set; }
public string textBoxLastName { get; private set; }
public string textBoxCity { get; set; }
public string textBoxState { get; set; }
public string messageBox { get; private set; }
private CustomerViewPresenter customerViewPresenter;
public CustomerViewMock()
{
customerViewPresenter = new CustomerViewPresenter(this);
}
public void ButtonLoad()
{
customerViewPresenter.LoadCustomer();
}
public void ButtonSave()
{
customerViewPresenter.SaveCustomer();
}
#region ICustomerView Members
public string CustomerIdInput
{
get { return textBoxCustomerId; }
}
public string CustomerIdReadOnly
{
get { return textBoxCustomerIdReadOnly; }
set { textBoxCustomerIdReadOnly = value; }
}
public string FirstName
{
get { return textBoxFirstName; }
set { textBoxFirstName = value; }
}
public string LastName
{
get { return textBoxLastName; }
set { textBoxLastName = value; }
}
public string City
{
get { return textBoxCity; }
set { textBoxCity = value; }
}
public string State
{
get { return textBoxState; }
set { textBoxState = value; }
}
public void ShowMessage(string message)
{
messageBox = message;
}
#endregion
}
CustomerViewTest - And here is my test class with the various tests that I would have normally had to do manually. Now I can go in and make changes to the logic of my presenter and quickly run my existing tests and be sure I am not going to break any existing logic.
[TestClass]
public class CustomerViewTest
{
public CustomerViewTest()
{
}
[TestMethod]
public void CustomerView_LoadValidCustomerId()
{
CustomerViewMock customerView = new CustomerViewMock();
customerView.textBoxCustomerId = "1";
customerView.ButtonLoad();
Assert.AreEqual<string>("1", customerView.textBoxCustomerIdReadOnly);
}
[TestMethod]
public void CustomerView_SaveCustomerCity()
{
CustomerViewMock customerView = new CustomerViewMock();
customerView.textBoxCustomerId = "1";
customerView.ButtonLoad();
customerView.City = "Bellevue";
customerView.ButtonSave();
Assert.AreEqual<string>("Customer Saved", customerView.messageBox);
}
[TestMethod]
public void CustomerView_CustomerIdTextBoxEmpty()
{
CustomerViewMock customerView = new CustomerViewMock();
customerView.textBoxCustomerId = "";
customerView.ButtonLoad();
Assert.AreEqual<string>("CustomerId cannot be empty", customerView.messageBox);
}
[TestMethod]
public void CustomerView_CustomerIdTextBoxWithSpace()
{
CustomerViewMock customerView = new CustomerViewMock();
customerView.textBoxCustomerId = "";
customerView.ButtonLoad();
Assert.AreEqual<string>("CustomerId cannot be empty", customerView.messageBox);
}
[TestMethod]
public void CustomerView_CustomerIdTextBoxNotInteger()
{
CustomerViewMock customerView = new CustomerViewMock();
customerView.textBoxCustomerId = "ABC";
customerView.ButtonLoad();
Assert.AreEqual<string>("CustomerId must be an integer value", customerView.messageBox);
}
}
That is all I have for now. Please provide feedback if you see anything wrong or have any suggestions that would further improve my approach. I am thinking about adding on to this post an example of taking the Interface and Presenter and moving them into its own project. Then creating this same interface in asp.net just to show the ability to reuse the code. For now I hope this helps someone with understanding the MVP – Passive View pattern.
-Model-View-Presenter-Passive-View.aspx)