Create better software by applying SOLID principles

SOLID is an acronym for five design principles that are considered fundamental to object-oriented programming. These principles, when followed correctly, can help to create more robust, flexible, and maintainable code. The SOLID principles are:

  • Single Responsibility Principle (SRP)
  • Open-Closed Principle (OCP)
  • Liskov Substitution Principle (LSP)
  • Interface Segregation Principle (ISP)
  • Dependency Inversion Principle (DIP)

In this article, we will discuss each of these principles in detail and how they can be applied in practice.

  1. Single Responsibility Principle (SRP)

The Single Responsibility Principle (SRP) states that a class should have only one reason to change. In other words, a class should have only one responsibility. This principle aims to make classes more focused and easier to understand, maintain and test.

If a class has multiple responsibilities, it becomes harder to change the class without affecting other parts of the system. This can lead to a situation where a change in one part of the codebase leads to unintended consequences in other parts of the system. By adhering to the SRP, each class has a clear and distinct purpose, making it easier to modify and maintain.

  1. Open-Closed Principle (OCP)

The Open-Closed Principle (OCP) states that classes should be open for extension but closed for modification. In other words, a class should be designed in such a way that new functionality can be added to it without changing its existing code.

This principle encourages the use of inheritance and interfaces to create a more flexible and extensible design. By designing classes in this way, it becomes easier to add new features to the system without having to modify existing code. This can lead to a more maintainable and scalable codebase.

  1. Liskov Substitution Principle (LSP)

The Liskov Substitution Principle (LSP) states that subclasses should be substitutable for their base classes. In other words, if a program is written to use a base class, it should be able to use any subclass of that base class without issues.

This principle is important for maintaining the behavior and correctness of the codebase. By adhering to the LSP, it becomes easier to create and use new classes that are related to existing ones. This can lead to a more modular and reusable codebase.

  1. Interface Segregation Principle (ISP)

The Interface Segregation Principle (ISP) states that a class should not be forced to depend on methods it does not use. In other words, interfaces should be designed to be as specific as possible to the needs of the class that uses them.

This principle encourages the use of smaller, more specific interfaces rather than large, general-purpose interfaces. By adhering to the ISP, classes can be designed to depend on only the functionality they need, which can lead to a more maintainable and robust codebase.

  1. Dependency Inversion Principle (DIP)

The Dependency Inversion Principle (DIP) states that high-level modules should not depend on low-level modules. Instead, both should depend on abstractions. In addition, abstractions should not depend on details. Details should depend on abstractions.

This principle encourages the use of abstractions to reduce coupling between different parts of the system. By designing classes in this way, it becomes easier to change the implementation of a class without affecting other parts of the system. This can lead to a more flexible and maintainable codebase.

In conclusion, the SOLID principles are a set of design principles that can help to create more robust, flexible, and maintainable code. By adhering to these principles, developers can create more modular and reusable code, which can lead to a more efficient and effective development process. While these principles may take some time and effort to apply

Countdown to New Year's with the Observer Pattern

One design pattern that you might find fun to relate to New Year's Eve is the Observer design pattern. The Observer design pattern is a behavioral design pattern that defines a one-to-many dependency between objects, so that when one object changes state, all of its dependents are notified and updated automatically.

You can think of New Year's Eve as the "subject" in this analogy, and all of the people celebrating the new year as the "observers". When the clock strikes midnight and the new year begins, the subject (New Year's Eve) changes state, and all of the observers (people celebrating the new year) are notified and updated automatically.

Here is an example of the Observer pattern in C#:

public interface ISubject
{
    void Attach(IObserver observer);
    void Detach(IObserver observer);
    void Notify();
}

public interface IObserver
{
    void Update();
}

public class NewYearsEve : ISubject
{
    private readonly List<IObserver> observers;

    public NewYearsEve()
    {
        observers = new List<IObserver>();
    }

    public void Attach(IObserver observer)
    {
        observers.Add(observer);
    }

    public void Detach(IObserver observer)
    {
        observers.Remove(observer);
    }

    public void Notify()
    {
        foreach (IObserver observer in observers)
        {
            observer.Update();
        }
    }
}

public class PartyGoer : IObserver
{
    public void Update()
    {
        Console.WriteLine("It's midnight! Happy New Year!");
    }
}

In this example, the NewYearsEve class is the subject, and the PartyGoer class is the observer. The NewYearsEve class has methods for attaching and detaching observers, and a method for notifying all of its observers when its state changes. The PartyGoer class has an Update method that is called when the NewYearsEve subject changes state.

Here is an example of how you could use the Observer design pattern in a New Year's Eve scenario:

NewYearsEve newYearsEve = new NewYearsEve();

PartyGoer partyGoer1 = new PartyGoer();
PartyGoer partyGoer2 = new PartyGoer();
PartyGoer partyGoer3 = new PartyGoer();

newYearsEve.Attach(partyGoer1);
newYearsEve.Attach(partyGoer2);
newYearsEve.Attach(partyGoer3);

newYearsEve.Notify();

Example Output at Midnight:

It's midnight! Happy New Year!


I hope this example gives you some ideas for how you can relate the Observer design pattern to New Year's Eve! Let me know if you have any questions or need further clarification.

Decorating the tree for Christmas

As a software developer, I've always been fascinated by design patterns and how they can help solve common problems in software design. This holiday season, I've been thinking a lot about how some of these patterns can be incorporated into our daily lives, just like the themes and traditions of Christmas.

One pattern that I've found particularly useful is the "Decorator" pattern. This pattern allows us to add new functionality to an existing object without altering its structure. In the spirit of Christmas, we can think of this pattern as a way to add extra decorations or ornaments to a Christmas tree without changing the tree itself. Just like how we can add various ornaments to a tree to make it more festive and personalized, the Decorator pattern allows us to add new features to an object without changing its core functionality.

Here is an example using C#

// The base component interface
public interface ITree
{
    void Display();
}

// The concrete component classes
public class PineTree : ITree
{
    public void Display()
    {
        Console.WriteLine("I am a pine tree.");
    }
}

public class FirTree : ITree
{
    public void Display()
    {
        Console.WriteLine("I am a fir tree.");
    }
}

// The base decorator class
public abstract class TreeDecorator : ITree
{
    protected ITree tree;

    public TreeDecorator(ITree tree)
    {
        this.tree = tree;
    }

    public virtual void Display()
    {
        tree.Display();
    }
}

// Concrete decorator classes
public class ChristmasLightsDecorator : TreeDecorator
{
    public ChristmasLightsDecorator(ITree tree) : base(tree) {}

    public override void Display()
    {
        base.Display();
        Console.WriteLine("I am decorated with Christmas lights.");
    }
}

public class OrnamentsDecorator : TreeDecorator
{
    public OrnamentsDecorator(ITree tree) : base(tree) {}

    public override void Display()
    {
        base.Display();
        Console.WriteLine("I am decorated with ornaments.");
    }
}

public class GarlandDecorator : TreeDecorator
{
    public GarlandDecorator(ITree tree) : base(tree) {}

    public override void Display()
    {
        base.Display();
        Console.WriteLine("I am decorated with garland.");
    }
}

// Client code
ITree tree = new PineTree();
tree = new ChristmasLightsDecorator(tree);
tree = new OrnamentsDecorator(tree);
tree = new GarlandDecorator(tree);
tree.Display();

I am a pine tree.
I am decorated with Christmas lights.
I am decorated with ornaments.
I am decorated with garland.

This demonstrates how the decorator pattern allows you to dynamically add new behavior to an existing object by wrapping it in decorator objects that implement the same interface. Using an interface to define the base component class allows you to decorate objects of different types, as long as they implement the same interface.

Merry Christmas

A book that inspired my journey Design Patterns Explained 

eBay suspends my account

I had created an account with eBay back in the beginning and had not used it in a long time. I reset my password because I had forgotten it and upon login I was informed my account had been suspended. I sent them a request to reactivate it and received this response. What has happened to this company? Who treats their customers like this?

——— eBay response ——-

Thanks for your email. I can see clearly that you wanted to know why your account was suspended and that you wanted to appeal its suspension. I have reviewed your account and I found out that it was suspended because the pattern of activities exhibits a risk to eBay and to its community.

As eBay is an internet-based business, and its members are our customers, we have to carefully weigh the risks involved with allowing users on our site. From time to time, we find buying, selling or registration patterns, which posts certain risks that no longer justifies a continuing relationship with our platform. When that happens, we suspend these accounts indefinitely, which includes buying and selling. We have determined that it is in our mutual best interest to part ways.

We regret any frustration or inconvenience this matter may cause you. There is no appeal for this decision. From this point forward, in order to conduct business on the internet, you will have to find a different venue.

Please keep in mind that, if we find associated accounts, they will also be suspended with no chance for appeals.

I know this is not the answer you are hoping for, but this is our final decision. We wish you luck on your future endeavors and we’ll fervently hope for your success.

Validating your SSL certificate is properly installed for SMTP - POP3 - IMAP - HTTP

I recently installed a new SSL certificate on one of my Linux boxes and wanted to verify that my email server was using the new certificate. For HTTP this can be easy as you simply go to the secure URL and check your browsers SSL Icon to see that the certificate is as expected. However for SMTP, POP3 and IMAP I was not aware of a similar way to verify.

After some research I found that you can validate using a feature built into OpenSSL

Secure SMTP

openssl s_client -showcerts -starttls smtp -crlf -connect localhost:587

Secure IMAP

openssl s_client -showcerts  -crlf -connect localhost:993

Secure POP3

openssl s_client -showcerts  -crlf -connect localhost:995

Secure HTTP

openssl s_client -showcerts  -crlf -connect localhost:443

This will return something like the following that you can then use to verify your SSL certificate is installed properly

CONNECTED(00000003)
depth=0 OU = Domain Control Validated, OU = PositiveSSL, CN = c1.infoconex.com
verify error:num=20:unable to get local issuer certificate
verify return:1
depth=0 OU = Domain Control Validated, OU = PositiveSSL, CN = c1.domain.com

---
Certificate chain
 0 s:/OU=Domain Control Validated/OU=PositiveSSL/CN=c1.domain.com
   i:/C=GB/ST=Greater Manchester/L=Salford/O=COMODO CA Limited/CN=COMODO RSA Domain Validation Secure Server CA


Installing Roundcube Webmail on BlueOnyx 5209

I recently had to migrate some older BlueOnyx and BlueQuartz servers to newer hardware and took the opportunity to install a newer webmail interface called Roundcube.

For those interested in the steps to install on the BlueOnyx 5209 hosting control panel that runs on CentOS 7 here are the instructions.

Here is a link to the same instructions but in txt format: Roundcube Install.txt (8.21 kb)

Create a temporary folder to download the install to and download the roundcube install.

mkdir /home/downloads
cd /home/downloads
wget https://downloads.sourceforge.net/project/roundcubemail/roundcubemail/1.1.4/roundcubemail-1.1.4-complete.tar.gz
tar -xvzf roundcubemail-1.1.4-complete.tar.gz

Backup the php.conf file that BlueOnyx creates by default so that we can enable PHP on the web server and ensure that future updates to php.conf wont overwrite our changes.

cp /etc/httpd/conf.d/php.conf /etc/httpd/conf.d/php_enable.conf
nano -w /etc/httpd/conf.d/php_enable.conf

 Uncomment or add the following contents to the file

<FilesMatch \.php$>
    SetHandler application/x-httpd-php
</FilesMatch>
AddType text/html .php
DirectoryIndex index.php

Create a php test file

nano -w /var/www/html/phpinfo.php

Add the following to the file

<? phpinfo(); ?>

 Login to the BlueOnyx interface and add the following paths to the PHP.INI settings. Security -> PHP Settings -> PHP.INI

/var/www/html
/etc/mail/
/var/log/roundcubemail/

Open a browser and see if the php information is displayed. If this steps works you are ready to move to the next step.

http://www.yourdomain.com/phpinfo.php

Install php-intl that is a pre-requisite for Roundcube

yum install php-intl

Move roundcube to the webserver folder

cd /home/downloads
mv roundcubemail-1.1.4 /var/www/html/roundcubemail

You should now be able to access the web installer that will be used to generate the config.inc.php file.

http://www.yourdomain.com/roundcubemail/installer/

Follow the steps to select the configure the features you would like to enable. At the end it will return text that is to be put into the configuration file.

nano -w /var/www/html/roundcubemail/config/config.inc.php

Copy the configuration information to the open file.

The next step is optional but I added the following changes to the virtuser_file.php file to remove the host information that is returned on the BlueOnyx server so that the users suggested email address does not include the host portion of the domain. For example sites on the box often start with @www.domain.com or @mail.domain.com and I only want them to be presented with @domain.com

nano -w /var/www/html/roundcubemail/plugins/virtuser_file/virtuser_file.php

#Find the line that starts with this
if (count($arr) > 0 && strpos($arr[0], '@')) {

#Change the contents between the open and close brace to look like the following

if (count($arr) > 0 && strpos($arr[0], '@')) {

    if(strpos($arr[0], 'www.')){
        $arr[0] = str_replace('www.', '', $arr[0]);
    }
    else if(strpos($arr[0], 'users.')){
        $arr[0] = str_replace('users.', '', $arr[0]);
    }
    else if(strpos($arr[0], 'mail.')){
        $arr[0] - str_replace('mail.', '', $arr[0]);
    }

    $result[] = rcube_utils::idn_to_ascii(trim(str_replace('\\@', '@', $arr[0])));

    if ($p['first']) {
        $p['email'] = $result[0];
    break;
    }
}

Download infinitescroll plugin which creates a nice infinite scroll experience when paging through messages.

mkdir /var/www/html/roundcubemail/plugins/infinitescroll
cd /var/www/html/roundcubemail/plugins/infinitescroll
wget https://github.com/messagerie-melanie2/Roundcube-Plugin-Infinite-Scroll/archive/master.zip
unzip master.zip
mv ./Roundcube-Plugin-Infinite-Scroll-master/* .
rm Roundcube-Plugin-Infinite-Scroll-master/ -rf
rm master.zip

Create MySQL database

mysql -u root -p
CREATE DATABASE roundcubemail;
GRANT ALL PRIVILEGES ON roundcubemail.* TO roundcube@localhost IDENTIFIED BY 'cairngorm';
FLUSH PRIVILEGES;
exit

Import the roundcube database

mysql roundcubemail -u root -p < /var/www/html/roundcubemail/SQL/mysql.initial.sql

Setup /webmail alias so that all sites on the box can navigate to webmail by going to their domain ex: www.yourdomain.com/webmail

nano -w /etc/httpd/conf.d/roundcubemail.conf
Alias /webmail /var/www/html/roundcubemail

Restart the web server

service httpd restart

Now go to www.yourdomain.com/webmail and login to the Roundcube webmail interface.


My favorite design patterns are Strategy and Factory Method

A number of years back I started my exploration into the world of design patterns and read an incredible book “Design Patterns Explained” that did a great job in getting me started on a path that would ultimately change the way I developed code forever.

As I learned more about design patterns I began to see that in many cases I was already using some of those patterns. When I finished with the book I was armed with knowing about design patterns but was not exactly sure how some of those patterns would be put into practice. I knew the only way I was going to actually use these patterns was to writing code and attempting to use the patterns I had learned.

Jump forward a few years now and the two patterns that I see used the most in my software projects are the Strategy Pattern part of the Behavioral Pattern family and Factory Method Pattern part of the Creational Pattern family.  When I typically use these two patterns they are almost always used together, the strategy pattern for implementing different behaviors that my application will use and the factory method pattern to encapsulate the logic required for deciding which concrete implementation of the strategy will be used.

In order to demonstrate the use of these patterns I am going to create a simple application that I may have typically written in the past that could benefit from these two patterns. Unfortunately when I was learning about many of the patterns what was never really clear was when a pattern might typically be used to improve the code I was currently writing. I hope that by the end of the article you will see for at least these two patterns how you might be able to implement these patterns.

Application Requirements

You will be building a simple console application that will be used to check to see if a website is up. The console application will initially be run manually by an individual responsible for making sure that the various websites are up and responding. The application must be able to check the content of the returned HTML for a given string to ensure that the content retrieved is returning the expected information. The application must take the following pieces of information as input (website address, content to look for) and then return the word SUCCESS if it found the content and ERROR followed by another line indicating the reason the test failed. The application should also write out the steps that it is performing to provide feedback to the person running the application.

Application V1.0 – First version written to deal with the current requirements. (Note: do not get caught up in the lack of validation of input parameters as the sample is designed to focus on the strategy pattern not best practices for writing the application as a whole.)

using System;
using System.Net;

namespace Design_Patterns
{
    internal class Program
    {
        f(string[] args)
        {
            // More validation would be necessary but the article is not
            // about validation of input ;-)
            if (args.Length != 2)
            {
                Console.WriteLine("You must supply the URL and Content to check for.");
            }

            string websiteUrl = args[0];

            Console.WriteLine("URL supplied to be validated: {0}", websiteUrl);

            string contentToVerify = args[1];

            Console.WriteLine("Content to be verified: {0}", contentToVerify);

            WebClient webClient = new WebClient();

            try
            {
                Console.WriteLine("Attempting to retrieve content");

                string htmlContent = webClient.DownloadString(websiteUrl);

                Console.WriteLine("Content downloaded, checking to see if content exists.");

                if (htmlContent.Contains(contentToVerify))
                {
                    Console.WriteLine("SUCCESS: Content supplied was found.");
                }
                else
                {
                    Console.WriteLine("ERROR: Content was not found in the returned html.");
                }
            }
            catch (Exception ex)
            {
                Console.WriteLine("ERROR: Exception occurred while downloading content: {0}", ex.Message);
            }

            Console.WriteLine("-- Hit enter To close application –");

            Console.Read();
        }
    }
}


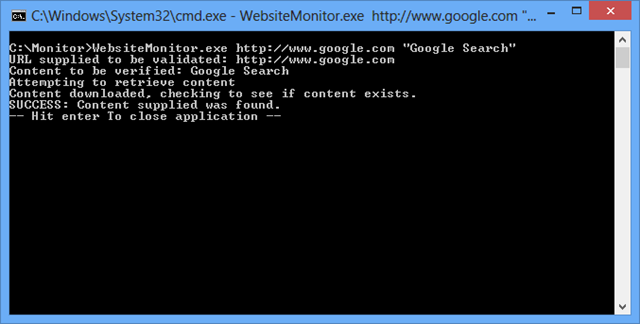
Application Results – Running the application from a command prompt to test and see pulling down the html for www.google.com we could find the content “Google Search” and things worked as expected..
image


Application Revision

The application designed has meet the needs expected, however after using it for a period of time it is realized that while it is great that someone can open the application and manually verify that a website is up and returning the expected content, they would like to make the process automated instead of manually running have it run on a regular basis and then have the person responsible check periodically to see the results of the tests. It is proposed that you log the output of the results to a text file that the person will check.

Application V1.1 – Second version to add ability to run manually or automatically and log results to a log file when automated.

using System;
using System.IO;
using System.Net;

namespace Design_Patterns
{
    internal class Program
    {
        private static StreamWriter fileWriter = null;
        private static bool useFileWriter = false;
        private const string loggingFileName = "WebsiteMonitor.log";

        private static void Main(string[] args)
        {
            try
            {
                // More validation would be necessary but the article is not
                // about validation of input ;-)
                if (args.Length < 2)
                {
                    WriteMessage("You must supply the URL and Content to check for."); return;
                }
                // If third argument supplied then it is used to determine
                // if the application will log to a file
                if (args.Length == 3)
                {
                    useFileWriter = Convert.ToBoolean(args[2]);

                    if (useFileWriter)
                    {
                        fileWriter = File.CreateText(loggingFileName);
                    }
                }

                string websiteUrl = args[0];

                WriteMessage(string.Format("URL supplied to be validated: {0}", websiteUrl));

                string contentToVerify = args[1];

                WriteMessage(string.Format("Content to be verified: {0}", contentToVerify));

                WebClient webClient = new WebClient();

                try
                {
                    WriteMessage("Attempting to retrieve content");

                    string htmlContent = webClient.DownloadString(websiteUrl);

                    WriteMessage("Content downloaded, checking to see if content exists.");

                    if (htmlContent.Contains(contentToVerify))
                    {
                        WriteMessage("SUCCESS: Content supplied was found.");
                    }
                    else
                    {
                        WriteMessage("ERROR: Content was not found in the returned html.");
                    }
                }
                catch (Exception ex)
                {
                    WriteMessage(string.Format("ERROR: Exception occurred while downloading content: {0}", ex.Message));
                }

                WriteMessage(string.Format("Test completed at: {0}", DateTime.Now));

                if (!useFileWriter)
                {
                    WriteMessage("-- Hit enter To close application --");

                    Console.Read();
                }
            }
            finally
            {
                if (fileWriter != null) fileWriter.Dispose();
            }
        }

        /// <summary>
        /// Writes the message to either the console or file based on configuration
        /// </summary>
        /// <param name="message"></param>
        private static void WriteMessage(string message)
        {
            if (!useFileWriter)
            {
                Console.WriteLine(message);
            }
            else
            {
                fileWriter.WriteLine(message);
            }
        }
    }
}


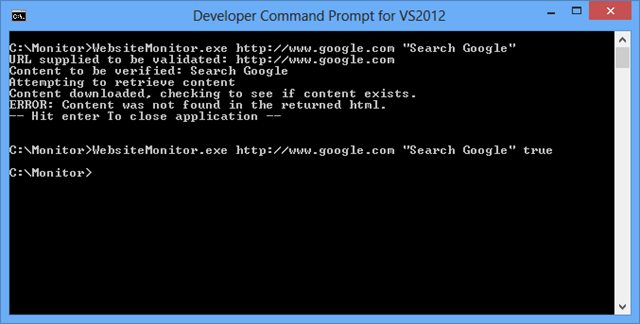
Application Results - Now when you run the application manually as before you get the same output to the console. However you can also run and provide a third argument of true and the output will be written to a log file named WebsiteMonitor.log with the results. The issue with the above code is that the main method now has to be aware of how to write the message in the two different ways. You can imagine that if asked to add a third way of logging to an XML file, the main method starts to get even more complex and its responsibility of knowing about logging becomes a bit out of hand.
image


Solution

Implement the strategy pattern to deal with the various ways the application would like to implement various logging algorithms.

Strategy Pattern

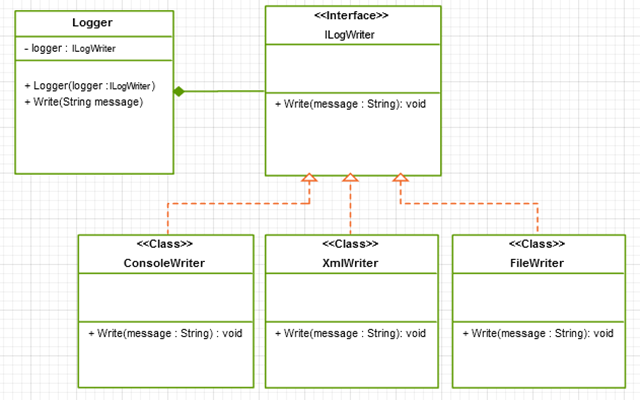
When you look at any article that discusses the strategy pattern you will typically find a UML diagram that shows the various items that make up the pattern. The following UML diagram is an example of the strategy pattern that I will be implementing for logging messages in example code.
image


Let me take a minute to explain what the above UML diagram says about the logging I will be implementing.

  • Logger – Represents the context class that will contain the logging strategy. This is the class that our client code (Program.cs main method) will use to implement logging of messages for the system. The line between the Logger and the ILogWriter with the filled diamond indicates that our Logger class will always have a ILogWriter instance. Notice also that the Logger class has a constructor that takes an ILogWriter object that you will see comes into play as we refactor the existing code.
  • ILogWriter – Represents the logging strategy that we are implementing for the application. In this case the ILogWriter is an interface that defines that all strategy classes must implement a Write method that will be used to write the message to be logged. However the interface does not contain any implementation but rather defines the contract for any concrete class that implement the interface.
  • ConsoleWriter, XmlWriter, FileWriter – Represents the concrete classes that will represent each of the logging algorithms that can be used by the application. The dashed lines between the concrete classes and strategy indicate that the concrete classes implement the ILogWriter interface.

Application V1.2 – Use the strategy pattern to remove some of the complexity in the main method and remove it from being responsible for having to understand the various algorithms required for doing logging of messages.

Create strategy – ILogWriter interface that specific logging algorithms will use.

namespace Design_Patterns
{
    public interface ILogWriter 
    {
        void Write(string message);
    }
}

Create the new concrete classes that will do the logging for Console and File logging

Console Writer – Class that will be responsible for logging messages to the console

using System;

namespace Design_Patterns
{
    public class ConsoleWriter : ILogWriter 
    {
        public void Write(string message)
        {
            Console.WriteLine(message);
        }
    }
}


File Writer – Class that will be responsible for logging messages to a file

using System;
using System.IO;

namespace Design_Patterns
{
    public class FileWriter : ILogWriter, IDisposable
    {
        private const string logFileName = "WebsiteMonitor.log";
        private StreamWriter fileWriter = null;

        public FileWriter()
        {
            fileWriter = File.CreateText(logFileName);
            fileWriter.AutoFlush = true;
        }

        public void Write(string message)
        {
            fileWriter.WriteLine(message);
        }

        /// <summary>
        /// Dispose method ensures that the file is closed and disposed
        /// </summary>
        public void Dispose()
        {
            if (fileWriter != null) fileWriter.Dispose();
        }

    }
}

Logger – Client in strategy pattern that will contain an instance of the strategy to do the logging for the application. This class will be used inside the Program main method to do the logging for the application. The default  logger that will be used if not defined is the console logger, this allows us to implement the same behavior that the original application had without any extra configuration. You can also alternatively pass in the type of logger you wish to create or pass in a specific strategy required, this will be important when we implement the final refactoring as you will see in a bit.

using System;

namespace Design_Patterns
{
    public class Logger : IDisposable
    {
        private ILogWriter logger;

        /// <summary>
        /// Default constructor will implement a console writer
        /// </summary>
        public Logger()
        {
            logger = new ConsoleWriter();
        }

        /// <summary>
        /// Initializes a new logger based on the LoggerType provided
        /// </summary>
        /// <param name="loggerType">LoggerType to use</param>
        public Logger(LoggerType loggerType)
        {
            switch (loggerType)
            {
                case LoggerType.Console:
                    logger = new ConsoleWriter();
                    break;
                case LoggerType.File:
                    logger = new FileWriter();
                    break;
                case LoggerType.Xml:
                    logger = new XmlWriter();
                    break;
                default:
                    throw new Exception("LoggerType unknown: " + loggerType);
            }
        }

        /// <summary>
        /// Logger type can be passed in
        /// </summary>
        /// <param name="logger">ILogWriter</param>
        public Logger(ILogWriter logger)
        {
            this.logger = logger;
        }

        /// <summary>
        /// Write message to logger
        /// </summary>
        /// <param name="message"></param>
        public void Write(string message)
        {
            logger.Write(message);
        }

        /// <summary>
        /// Dispose logger if IDisposable is implemented
        /// </summary>
        public void Dispose()
        {
            if (logger is IDisposable && logger != null)
            {
                ((IDisposable)logger).Dispose();
            }
        }
    }
}


Program – Application code that has now been refactored to use the strategy pattern. Take note that this class no longer knows anything about how to perform logging. The only thing that remains regarding logging is the code that decides what type of logger the application should use. These changes will provide an approach that will allow our application to expand and use different loggers as requirements change without having to change the logic in the main method. The program also no longer needs to know anything about how logging happens. The WriteMessage method has now been removed, the application when started looks to see if file logging is required and if so instantiates a new logger passing in that it will need to implement file logging, otherwise the default logger is initialized which will do console logging which is the same as the previous behavior.

using System;
using System.Net;

namespace Design_Patterns
{
    internal class Program
    {
        private static bool useFileWriter = false;

        private static void Main(string[] args)
        {
            Logger logger = null;

            try
            {
                // If third argument supplied then it is used to determine
                // if the application will log to a file
                if (args.Length == 3)
                {
                    useFileWriter = Convert.ToBoolean(args[2]);

                    if (useFileWriter)
                    {
                        logger = new Logger(LoggerType.File);
                    }
                }

                if (logger == null)
                {
                    logger = new Logger();
                }

                // More validation would be necessary but the article is not
                // about validation of input ;-)
                if (args.Length < 2)
                {
                    logger.Write("You must supply the URL and Content to check for.");

                    return;
                }

                string websiteUrl = args[0];

                logger.Write(string.Format("URL supplied to be validated: {0}", websiteUrl));

                string contentToVerify = args[1];

                logger.Write(string.Format("Content to be verified: {0}", contentToVerify));

                WebClient webClient = new WebClient();

                try
                {
                    logger.Write("Attempting to retrieve content");

                    string htmlContent = webClient.DownloadString(websiteUrl);

                    logger.Write("Content downloaded, checking to see if content exists.");

                    if (htmlContent.Contains(contentToVerify))
                    {
                        logger.Write("SUCCESS: Content supplied was found.");
                    }
                    else
                    {
                        logger.Write("ERROR: Content was not found in the returned html.");
                    }
                }
                catch (Exception ex)
                {
                    logger.Write(string.Format("ERROR: Exception occurred while downloading content: {0}", ex.Message));
                }

                logger.Write(string.Format("Test completed at: {0}", DateTime.Now));

                if (!useFileWriter)
                {
                    logger.Write("-- Hit enter To close application --");

                    Console.Read();
                }
            }
            finally
            {
                if (logger != null) logger.Dispose();
            }
        }
    }
}


Our application however still needs to know a bit about how to create an instance of the Logger class and the various strategy classes, to solve this issue we are going to implement the Factory Method pattern which will be responsible for creating new instances. This will help when we decide to have some of our concrete strategy classes get more complex which could make our Logger class complex in understanding how to create the various instances in our switch statement. If you see the new statement used someplace it is probably a good indicator that a factory method pattern could be used. This article is getting a bit longer than I expected so I am going to do the next pattern in a part 2 article.

Stay Tuned!

Free collection of EBooks for various Microsoft Technologies

Found a page on the Technet site that provides a pretty good list of eBooks on various Microsoft Technologies

http://social.technet.microsoft.com/wiki/contents/articles/11608.e-book-gallery-for-microsoft-technologies.aspx

Topics covered

Office, SharePoint, SQL Server, System Center, Visual Studio, Web Development, Windows, Windows Azure, Windows Phone and Windows Server

Here is a twitter page also that free Microsoft eBooks get posted to as well

https://twitter.com/MSFreeEBooks

Windows 8 Hyper-V errors with "could not be started because the hypervisor is not running"

Just recently setup a new machine with Windows 8 and decided to install Hyper-V so that I could run windows XP for some of my legacy applications that will not run under Windows 8 64 bit. After installing Hyper-V components I attempted to setup a new virtual machine and start the install process when I was faced with the following error: "could not be started because the hypervisor is not running"

It turned out that I needed to run the following command

bcdedit /set hypervisorlaunchtype auto

After running the above command and restarting my machine it now works. Hope this helps save someone else hours they cannot back due to this issue.

Calling WCF Service using LINQPad

First, if you are a .NET developer and you are not using LINQPad yet go and check it out at www.linqpad.net. They offer a free version that is the same as the paid version but without intellisense and the pricing to upgrade to the full version is well worth the productivity gain you get.

Ok, with that out of the way let me get to the issue I came across and how I solved it.

Issue:

Created an assembly project in order to create a proxy to a web services using .NET Service Reference which I would then use in LINQPad to do some testing against my web service. Created a new linqpad script and added my reference to the assembly and wrote a method to call my web service. Upon executing I received an InvalidOperationException:

Could not find default endpoint element that references contract 'WCFAcctMgmtWebServiceReference.AccountManagementWebservicesSoap' in the ServiceModel client configuration section. This might be because no configuration file was found for your application, or because no endpoint element matching this contract could be found in the client element.

That is odd I can see that my assembly includes a file Proxy.exe.config that has the necessary service reference information

<system.serviceModel>
	<bindings>
		<basicHttpBinding>
			<binding name="AccountManagementWebservicesSoap" />
		</basicHttpBinding>
	</bindings>
	<client>
		<endpoint address="http://ws.domain.com/acctmgmt/v4/service.asmx"
			binding="basicHttpBinding" bindingConfiguration="AccountManagementWebservicesSoap"
			contract="WCFAcctMgmtWebServiceReference.AccountManagementWebservicesSoap"
			name="AccountManagementWebservicesSoap" />
	</client>
</system.serviceModel>

So why was it not working?

Answer:

Well it turns out that LINQPad needs to have this configuration information included in a file it uses since it is the application executing the proxy. At first glance one might assume they would place it in the the file included with LINQPad called LINQPad.exe.config but that would result in the same issue.

Instead you need to create a file in the same directory that LINQPad is installed in and name it linqpad.config

Adding the following to my new file resolved the issue

<?xml version="1.0" encoding="utf-8" ?>
<configuration>
	<system.serviceModel>
		<bindings>
			<basicHttpBinding>
				<binding name="AccountManagementWebservicesSoap" />
			</basicHttpBinding>
		</bindings>
		<client>
			<endpoint address="http://ws.domain.com/acctmgmt/v4/service.asmx"
				binding="basicHttpBinding" bindingConfiguration="AccountManagementWebservicesSoap"
				contract="WCFAcctMgmtWebServiceReference.AccountManagementWebservicesSoap"
				name="AccountManagementWebservicesSoap" />
		</client>
	</system.serviceModel>
</configuration>

 Hopefully this article will save someone the time I spent figuring this out.